Page 37 - 2010 - AOUT
P. 37
ject...project...project...project...project...project...project...project...project...
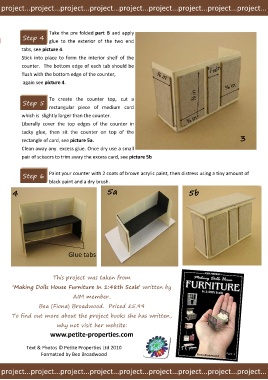
Take the pre folded part B and apply
Step 4 glue to the exterior of the two end
tabs, see picture 4.
Stick into place to form the interior shelf of the
counter. The bottom edge of each tab should be ⅜ in 3 /16in
flush with the bottom edge of the counter, ⅜ in
again see picture 4. ⅝ in
To create the counter top, cut a
Step 5 rectangular piece of medium card
which is slightly larger than the counter. ⅜ in
Liberally cover the top edges of the counter in
tacky glue, then sit the counter on top of the 3
rectangle of card, see picture 5a.
Clean away any excess glue. Once dry use a small
pair of scissors to trim away the excess card, see picture 5b
Step 6 Paint your counter with 2 coats of brown acrylic paint, then distress using a tiny amount of
black paint and a dry brush.
4 5a 5b
Glue tabs
This project was taken from
‘Making Dolls House Furniture In 1:48th Scale’ written by
AIM member,
Bea (Fiona) Broadwood. Priced £5.99
To find out more about the project books she has written,
why not visit her website:
www.petite‐properties.com
Text & Photos © Petite Properties Ltd 2010
Formatted by Bea Broadwood
project...project...project...project...project...project...project...project...project...